If you want to crochet hats, mandalas, amigurumi, or anything in the round, learning how to make a magic ring (also called a magic circle) is essential. Unlike starting with a chain loop, the magic ring allows you to pull your starting round tight, leaving no hole in the center. In this step-by-step tutorial, you’ll learn how to make a magic ring with ease perfect for beginners looking to elevate their crochet game.
If you’ve ever started a crochet project in the round like amigurumi, granny squares, hats, or baby booties you’ve probably heard of the magic ring (also called a magic circle). As a crocheter, I can tell you this simple technique makes a big difference in the final look of your work. It creates a tight, neat center without the hole that often appears when starting with chains.
In this guide, I’ll walk you through exactly how to make a magic ring step by step, share practical tips from my own crochet experience, and help you feel confident using this essential technique in your projects. Whether you’re a beginner or just looking to refine your skills, mastering the magic ring will open the door to many beautiful crochet patterns.

What Is a Magic Ring in Crochet?
A magic ring is an adjustable loop used to begin crochet projects worked in the round. Unlike starting with a chain loop, the magic ring allows you to pull the center tightly closed, creating a professional, polished finish.
You’ll commonly use a magic ring when making:
- Amigurumi toys
- Granny squares
- Hats and beanies
- Baby booties
- Coasters
- Mandalas
- Circular blankets
From my own projects, especially when crocheting amigurumi or decorative motifs for blankets on my crochet blogs, I’ve found that the magic ring gives a much cleaner result and helps prevent stuffing from showing through the center.
Materials You’ll Need
You only need a few basic supplies:
- Yarn (any weight suitable for your project)
- Crochet hook appropriate for the yarn
- Scissors
- Yarn needle (optional)
For beginners, I recommend starting with:
- Medium-weight yarn (worsted weight)
- Hook size 5 mm (H-8)
These materials are easier to handle and make learning the technique smoother.
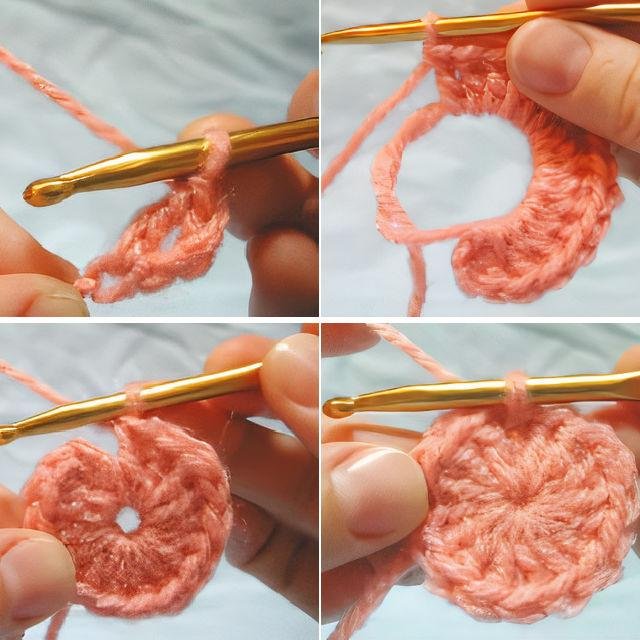
Step-by-Step: How to Make a Magic Ring
Follow these simple steps to create your first magic ring.
Step 1: Wrap the Yarn Around Your Fingers
Hold the yarn tail in your palm and wrap the working yarn around your index and middle finger twice, forming an “X” shape on the back of your hand.
Make sure the tail end is underneath the working yarn.

Step 2: Insert the Hook
Slide your crochet hook under the first strand of yarn, then grab the second strand and pull it under the first strand to create a loop.
At this point, you should have one loop on your hook.
Step 3: Chain One
Make one chain stitch to secure the loop.
This chain does not count as a stitch unless your pattern specifically says so.
Step 4: Work Stitches Into the Ring
Insert your hook into the center of the ring and crochet the required number of stitches.
Common examples:
- 6 single crochet (sc) for amigurumi
- 10–12 double crochet (dc) for granny squares
Keep working over both the loop and the yarn tail.
Step 5: Pull the Tail to Close the Ring
Once you finish the stitches, gently pull the yarn tail.
You’ll see the center close tightly—this is the magic of the magic ring!
Beginner Tip: Secure the Ring Properly
One tip I always share with readers is to pull the tail firmly but gently, then continue crocheting the next round before trimming the yarn. This helps lock the ring securely in place and prevents it from loosening later.
Common Mistakes and How to Fix Them
The Ring Won’t Close
Cause: You may have crocheted around only one strand instead of both.
Fix: Make sure you crochet over the loop and the yarn tail.
The Center Keeps Loosening
Cause: The tail wasn’t secured tightly enough.
Fix: Pull the tail firmly and weave it in securely with a yarn needle.
The Ring Feels Too Tight
Cause: Tension is too strong while forming the loop.
Fix: Relax your grip slightly and try again.
When Should You Use a Magic Ring?
Use a magic ring whenever your pattern:
- Starts in the round
- Requires a tight center
- Uses terms like:
- MR
- Magic ring
- Magic circle
- Adjustable ring
You’ll see this technique frequently in modern crochet patterns, especially in amigurumi and decorative motifs—two categories that remain very popular with readers across crochet blogs.
Magic Ring vs. Chain Ring
Here’s a quick comparison:
Magic Ring
- Adjustable center
- No hole
- Cleaner finish
- Preferred for amigurumi
Chain Ring
- Fixed size
- Small hole remains
- Easier for absolute beginners
- Works well for lace patterns
Both methods are useful, but once you master the magic ring, you’ll likely use it most of the time.
Practice Pattern: Simple Magic Ring Start
Try this quick exercise:
- Make a magic ring
- Chain 1
- Work 6 single crochet into the ring
- Pull the tail to close
- Join with a slip stitch
Repeat this a few times to build muscle memory. After a few attempts, the process becomes automatic.

Learning how to make a magic ring is one of the most valuable skills in crochet. It’s a small technique that makes a big difference in the appearance and durability of your projects. From amigurumi toys to blankets and accessories, this method helps your work look polished and professional.
If you’re building tutorials and educational content for your readers on My Sweet Crochet, this is exactly the kind of foundational skill that keeps beginners engaged and helps them grow in confidence.
Take a few minutes to practice, and soon the magic ring will become second nature in your crochet routine.
📥 Download the Free PDF
Prefer printed instructions?
📄 Download our free Magic Ring Crochet PDF Guide
🎥 Watch the Magic Ring Tutorial
Need a visual demo?
The magic ring might seem intimidating at first, but it’s a must-have tool for any crocheter working in the round. Once you’ve mastered this technique, you’ll love how clean and professional your projects look right from the first stitch.